Let’s start the year off with this note from an artist in Michigan, Gail Hayton…
Hi Heather,
I am one of your in cognito blog readers. LOVE, LOVE, LOVE your work. I am a retired woman who went from engineering to art for a second career. I am mostly self-taught but have a degree in architecture for many years ago that basically gave me an undergrad in art. I was interested in your use of the Artboard gesso and bought a jar. WOW, it is so thick and heavy. I was wondering if you could tell me how you apply it. I have been using ampersand board, but don’t like it. I want a smooth surface, but one that has enough tooth that I don’t have to apply several coats of paint to get a solid look to my paints. I have recently branched out into doing some trompe lóeil work and had to use several coats of paint. That process takes so long and I tend to start forgetting what colors I mixed together. I am hoping the Artboard gesso may relieve this problem. Do you thin your stuff or what?
Before I answer, here is a link to her website so we can all see the work she is doing and perhaps other readers will have thoughts as well…Click Here to view
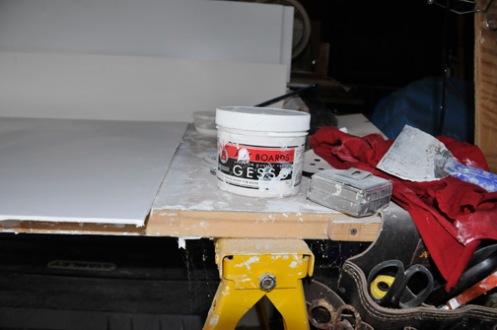
And here is the gesso she is referring to…
I’ve hopefully made these pics large enough for you to read the label. It gives a most thorough explanation of why this gesso is different from most out on the market. I’ll also include a link here to Dick Blick, since that is my go to source for almost all of my art supplies. Click here
And no, I’m not a sponsor for either DB or ABs gesso, though I wouldn’t turn down an offer.
Late last summer I did a marathon of panel making. Here is a lousy photo of just a part of the stack of 40 plus boards which I am thrilled now to have ready to pull and paint on…
You can’t see very well, but these are the canvas covered Dibond panels which have been gessoed to Kansas and back and then wet sanded, with excruciating care, and finally “oiled out” with a thin coat of Old Holland raw umber. What I was trying to show was how thin the final stack is, taking up just a few inches to house dozens.
So, back to Gail’s question…
I too tried the Ampersand boards and was most unsatisfied with their finished surfaces to paint on. I eventually used them as test panels to try various gessos on the market and even then, they just didn’t measure up.
As you can read on the label in photos above, this gesso is designed for panels. While it’s true that I technically am painting on a canvas, by the time it is adhered to the aluminum Dibond and then gessoed with many layers, the desired surface is as smooth and texture free as I can make it. The resulting panel is rigid and the sub structure of the Dibond is the most stable of any substrate available.
Unlike a canvas stretched over wooden support frames, there is zero movement on these panels. I’m no chemist, but I suspect that the Art Boards gesso, as it makes several references to being formulated for panels, and loaded with those “refined solids” , while providing a superior “tooth” … that delicious “eggshell vellum” surface might possibly crack under the bouncy movement of a canvas stretched over traditional wooden bars.
I can attest to the truth of every claim on their label. Good tone, great surface, creamy application, easily sandable, and love that tooth.
Ah, but yes Gail, it is thick. And boy is it expensive.
After years of experimentation, I have stumbled on this formula for gesso application.
For the first coat, I use a student grade product. Bought by the gallon, I’m satisfied with the Dick Blick version of acrylic white gesso. It is much thicker than others out there but still thin enough to cover well and quickly. I use a 3 or 4 inch wide beveled cheap plastic putty knife which spreads it on nicely without raised edges, (at least for the first several coats).
I let that dry overnight and lightly sand with an 80 grit foam sanding block, and then the second coat goes on. Repeat drying, sanding and recoating with a third coat, and I’m ready for the expensive stuff.
The thick creamy Art Boards gesso does indeed dry fast. And there is no easy way to do this, especially on a large panel, without some ridging from the putty knife. With each successive coat, the surface becomes slightly smoother and the weave of the canvas no longer hides imperfections. Believe me, this is the hardest part of the entire painting process for me.
I work very quickly, keep the lid covering the tub in between panels, even sand the edges of the plastic tool to avoid divots which would leave marks. I carefully light the garage, and turn the panel often, looking for unwanted tool markings. Those 8 foot panels are the stuff of nightmares.
The first coat of that good stuff is usually ok.
Because of the chalkiness, I sand less aggressively in between coats, using a 120 grit block. But I’ve learned that two final coats are all it takes. Yes, I could probably get away with one coat of the Art Boards, but the second coat seems to level out some of those errant application marks.
Then, it sits for at least three days to dry completely.
Anticipating a question, “why not use a brush”, been there done that and can’t handle the intensive sanding required to reduce the brushstroke markings down to the smoothness I prefer. Yes, I’ve tried to wet the surface so the paint can “flow” better, but that dilutes the gesso in unpredictable ways and defeats the purpose of buying a thick rich product.
The wet sanding process is where you can control just how much tooth you want. I use those same sanding sponges, probably a 120 or 220, and have a bucket of water and some junky terry cloth rags. With very little water, and working in one foot square spaces at a time, I gently sand until there is a slurry. Gently. It doesn’t take much but you can easily over do this…I have learned the hard way and had to redo many panels for lack of patience.
Once you get that slurry going, you want to take the rag and kind of wipe it, smoothing it out, without lifting it.This too takes some practice. You want to keep the slurry moving until it starts to dry and pull and then ease the rag off the surface in one last swipe.
Yeah, I probably lost most of you a while back, and I’ve had other artist friends throw brushes at me in dismay at this stage of the explanation, but, with some practice, it is not so difficult. Hard on the old joints, but not rocket science, just tedious.
After you spend a few hours wet sanding a panel, you start paying much more attention to smoothing out all the marks you can while applying those coats of gesso so you have less work to do at this final stage.
I will re-emphasize the “gently” part because it is easily possible to sand the tooth right out of this stuff leaving you with a glassy surface which will repel your paint. Been there done that. Easy does it. And a final very light sanding will help if you go too far. I can tell immediately, when I apply the raw umber as a ground, if I have sealed up all that tooth. Still have the option to rescue it with a good sanding but it is one step too far so… again with the patience.
I see that Gail is famous for her miniatures. There should be zero problem getting the gesso to lay smoothly and without ridges with one pass of a putty knife, but I’d still lightly sand between coats. I’m jealous.
Well that became a tome. But I needed a break. I’m currently mid-way through one of those larger paneled paintings and the old fingers were getting stiff. Typing has loosened them up but I’m thinking a night of knitting by the fireside might just reset all the gears.
Gail, if you’re still reading, thank you for your question, your kind words and your interest.
I’m happy to answer any follow up questions and wish you the best of luck.
Yours smooth panels and flying brushes,
Heather
A quick follow-up…
This from Gail…
I have 12 boards ready to go this week so I will study your blog and try this. The only question I have is that since you are applying so much gesso, to the point that the texture is gone, what purpose does the canvas serve? I am guessing it is only to give you a fighting chance of an even application of the gesso. Or does it somehow still aid the application of the paint?
Yes, I asked myself the same question about the canvas. The original use of canvas wrapped Dibond came from an article written by Ross Merrill of the NGA. He was looking for the most stable substrate for a canvas and came up with the Dibond. The archivist approach is that the canvas could, theoretically centuries from now, be removed from any support and maintain its integrity.
I know of a few artists who are painting directly on the Dibond.
It is powercoated with some enamaled paint process so the board arrives with a white painted surface. I sand that down to allow the gel medium to bond better when attaching the canvas. My hesitation is whether the gesso alone would bond sufficiently to that enameld paint to be “archival”.The bond of gesso on canvas has been proven over many centuries so I sleep better at night.
Cheers


